AngularJS with ASP.Net MVC (Part 5)

A step by step tutorial on how to use AngularJS with ASP.Net MVC

Precap

I have started this as a multi-post tutorial a few posts back, where in the previous parts we have created a minimal project in Visual Studio 2015 using Web Application’s Empty template with MVC folders and references. The application is running now and show Hello World! with all the required scripts and styles pushed to client in best optimal way. You can read those posts part 1part 2part 3 and part 4 in case you have not gone through that already. Let’s design a minimal layout here in this post.

Boot it with Bootstrap

Twitter Bootstrap is a well know library to provide components to bootstrap your web application like navigation, buttons and input controls styles. We have already included bootstrap library as a bower package in our application and is getting pushed to client side already. We just need to use it to design our sample application.

Open your _Layout.cshtml from Views -> Default folder and add the snippet shown below just above the @RenderBody().

<body>
    <nav class="navbar navbar-inverse navbar-fixed-top" role="navigation">
        <div class="container-fluid">
            <div class="navbar-header">
                <button type="button" class="navbar-toggle" data-toggle="collapse" data-target="#main-nav">
                    <span class="sr-only">Toggle navigation</span>
                    <span class="icon-bar"></span>
                    <span class="icon-bar"></span>
                    <span class="icon-bar"></span>
                </button>
                <a class="navbar-brand" href="">AngularJS with ASP.Net MVC</a>
            </div>
            <div class="collapse navbar-collapse" id="main-nav">
                <ul class="nav navbar-nav">
                    <li>
                        <a href="/Home/Page1">Page 1</a>
                    </li>
                    <li>
                        <a href="/Home/Page2">Page 2</a>
                    </li>
                    <li>
                        <a href="/Home/Page3">Page 3</a>
                    </li>
                </ul>
            </div>
        </div>
    </nav>
    @RenderBody()
    @Scripts.Render(new string[] { "~/js" })
</body>

MVC Controller – Actions

Create 3 new actions in the HomeController.cs as show below in the snippet and add corresponding View for them.

using System.Web.Mvc;

namespace AngularJSwithMVC.Controllers
{
    public class HomeController : Controller
    {
        // GET: Home
        public ActionResult Index()
        {
            return View();
        }

        public ActionResult Page1()
        {
            return View();
        }

        public ActionResult Page2()
        {
            return View();
        }

        public ActionResult Page3()
        {
            return View();
        }
    }
}

Views

P2062_001

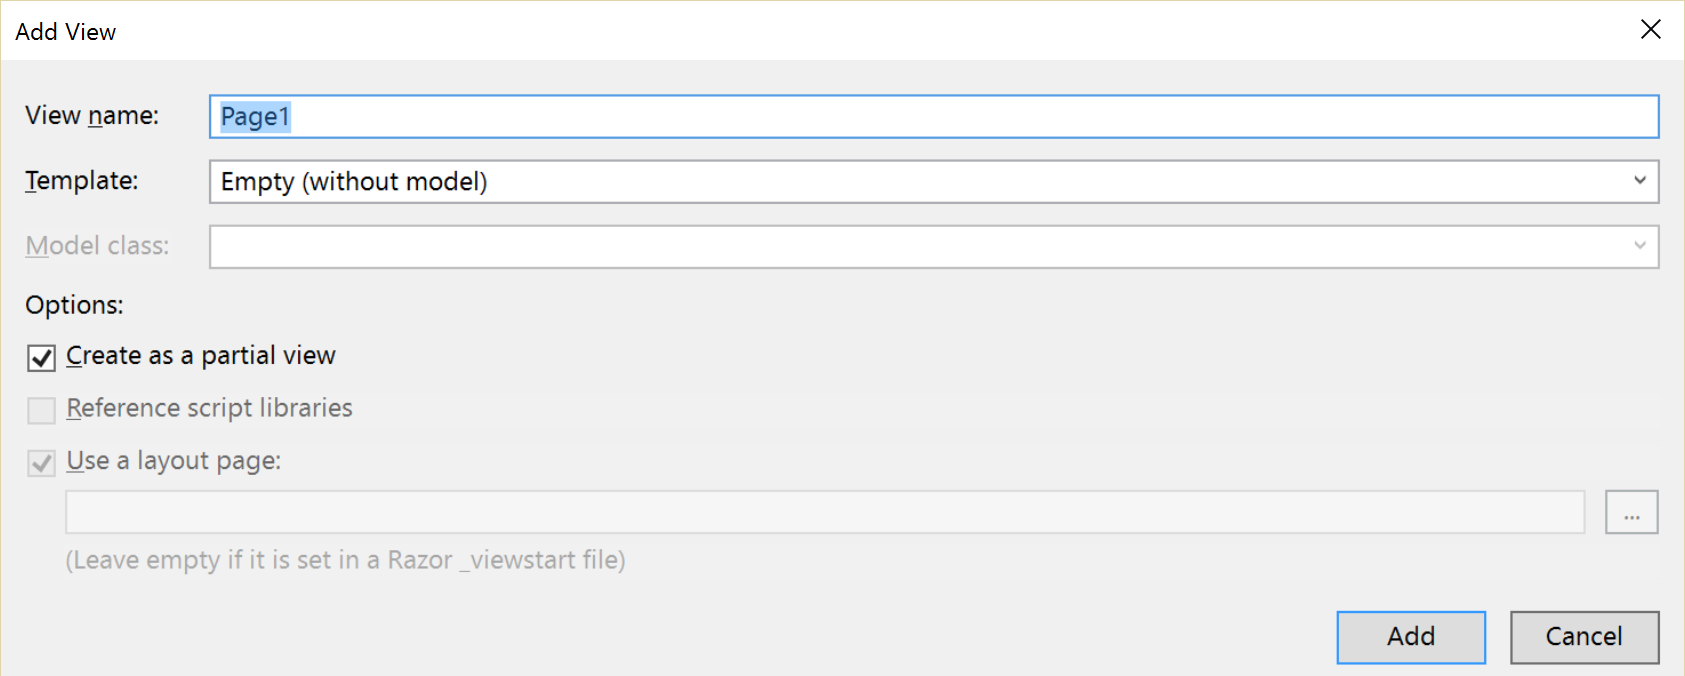
Index.cshtml
<h1>Home Page</h1>

Page1.cshtml
<h1>Page 1</h1>

Page2.cshtml
<h1>Page 2</h1>

Page3.cshtml
<h1>Page 3</h1>

And it is a MVC Application …

P2062_002

That’s all, we are ready at this point with our base sample MVC application and can see that all the views and routing is presented by ASP.Net MVC. If we are navigate to pages, we can see that a full page is getting reloaded, which is not true in case of AngularJS SPA. So, the next time we see each other, I will be showing you how to incorporate the AngularJS into it and delegate some control over views and routing to it. Till then in case you have any comments for me, please feel free to use the comment box below. I will be glad to help you out over here. I will continue with this series and the links for all the posts in this series will be updated in the list below.

Series Links

Part 1 Part 2 Part 3 Part 4 Part 6 Part 7 Part 8 Part 9 Part 10 Part 11

AngularJS with ASP.Net MVC (Part 4)

A step by step tutorial on how to use AngularJS with ASP.Net MVC

Precap

I have started this as a multi-post tutorial, where in the previous part we have created a minimal project in Visual Studio 2015 using Web Applications Empty template with MVC folders and references. The application is running now and show Hello World!. You can read that post part 1part 2 and part 3 in case you have not gone through that already. Let’s continue the idea …

For Web … Smaller and Lesser is Better

In the previous posts, we have reached to a point where we have included the required JavaScript libraries to the project using bower. All these files are in their respective folders under bower_components for the project, but they are not referenced in the page and are not served to the client with the html page. In this post we will be focusing on the way to deliver these files optimally to the client by using the asp.net web optimization bundles.

System.Web.Optimization contains a Class named BundleCollection, where we can add script and style bundles containing the files we would like to bundle together and serve on a single request, compressed and obfuscated. When I work with ASP.Net, I use this technique to minify and uglify the styles and scripts one the fly as compared to doing that in advance using different compressors and obfuscators. This gives me control on may be dynamically include the script files and conditionally compressing the files, e.g. compress while in production but not in development environment.

Get Them all Squeezed …

First of all we need to add this optimization library as a NuGet package (yes, you read it all right, NuGet is the right choice here in this scenario for maintaining the .net library packages). Open NuGet Manager for the project and search for “Optimization” in the browse tab. Select and install “Microsoft.AspNet.Web.Optimization” package from there as show in the image below. It may install a few required dependencies along with that, which you should allow it to do so.

P1916_001

In App_Start Folder create a new class named BundleConfig.cs and add the below code to it

using System.Web.Optimization;

namespace SchoolWorld.Web.App_Start
{
    public partial class BundleConfig
    {
        public static void RegisterBundles(BundleCollection bundles)
        {
            // bundle scripts
            bundles.Add(new ScriptBundle("~/js").Include(
            "~/bower_components/jquery/dist/jquery.js",
            "~/bower_components/angular/angular.js",
            "~/bower_components/angular-ui-router/release/angular-ui-router.js",
            "~/bower_components/bootstrap/dist/js/bootstrap.js"));

            // bundle styles
            bundles.Add(new StyleBundle("~/css").Include(
            "~/bower_components/bootstrap/dist/css/bootstrap.css",
            "~/Content/Site.css"));
        }
    }
}

The code above is self explaining, but for your clarity, we are creating 2 bundles, one for scripts and another for styles. These bundles when referenced in the view, will render the links to compressed / uncompressed files.

Bundle the Bundles with MVC View …

In above step we have created the bundles, now we have to register these bundles to the request handler and include them in the _Layout.cshtml. Open the Global.asax and replace the contents with the code below:

using SchoolWorld.Web.App_Start;
using System.Web.Mvc;
using System.Web.Optimization;
using System.Web.Routing;

namespace AngularJSwithMVC
{
    public class MvcApplication : System.Web.HttpApplication
    {
        protected void Application_Start()
        {
            AreaRegistration.RegisterAllAreas();
            RouteConfig.RegisterRoutes(RouteTable.Routes);
            BundleConfig.RegisterBundles(BundleTable.Bundles);
        }
    }
}

Open web.config under the Views folder (not the one in the project root folder) and add the namespace “System.Web.Optimization” under namespaces section.

<namespaces>
    <add namespace="System.Web.Mvc" />
    <add namespace="System.Web.Mvc.Ajax" />
    <add namespace="System.Web.Mvc.Html" />
    <add namespace="System.Web.Routing" />
    <add namespace="System.Web.Optimization" />
    <add namespace="AngularJSwithMVC" />
</namespaces>

Open _Layout.cshtml and replace the code with the one shown in below snippet

<!DOCTYPE html>
<html>
<head>
    <meta charset="utf-8" />
    <meta name="viewport" content="width=device-width, initial-scale=1.0">
    <title>My AngularJS App</title>
    @Styles.Render("~/css")
</head>
<body layout="column">
    @RenderBody()
    @Scripts.Render(new string[] { "~/js" })
</body>
</html>

Run the application and inspect the source using your browser’s development tools, you should see the output similar to this one

<!DOCTYPE html>
<html>
<head>
    <meta charset="utf-8" />
    <meta name="viewport" content="width=device-width, initial-scale=1.0">
    <title>My AngularJS App</title>
    <link href="/bower_components/bootstrap/dist/css/bootstrap.css" rel="stylesheet"/>
    <link href="/Content/Site.css" rel="stylesheet"/>
</head>
<body>
    Hello World!
    <script src="/bower_components/jquery/dist/jquery.js"></script>
    <script src="/bower_components/angular/angular.js"></script>
    <script src="/bower_components/angular-ui-router/release/angular-ui-router.js"></script>
    <script src="/bower_components/bootstrap/dist/js/bootstrap.js"></script>
</body>
</html>

Where is the Compression?

You can see in the above output that all the files we included in the bundles are included as it is, so where is the compression? Remember I have told you earlier that the files can be compressed conditionally, and here the default condition is Debugging mode. Edit the main web.config file and disable the debugging by setting compilation tag’s debug attribute to false under the system.web section. At this time if you run the application again you will see, what we are trying to achieve.

<!DOCTYPE html>
<html>
<head>
    <meta charset="utf-8" />
    <meta name="viewport" content="width=device-width, initial-scale=1.0">
    <title>My AngularJS App</title>
    <link href="/css?v=HWyqqv78-MmGFJmETyURBTAYJwiQc_rP-elFPK5iVQU1" rel="stylesheet"/>
</head>
<body>
    Hello World!
    <script src="/js?v=LNUvXDJjMnfrdY07Ho_exMpbrd7-3Pn1CNPHdzuuDy41"></script>
</body>
</html>

Both the bundles are replaced with a single link and if you inspect the response of these links in the network tab of your bowsers development tool, you will see that the contents are compressed and obfuscated.

I am loving it … are you?

We have started seeing it … isn’t it? The mixture of both the worlds are coming out with a pleasant color. I will conclude this post here and leave you to play more with this project a little more. In case you are not getting a hang of it, I am here, through your questions and I will try to answer them. Remember your comments will be a great help to me directing the right path for the upcoming tutorials and posts. Keep a watch and let me know what you want to learn more. I will add the links of the remaining parts of this posts below here for your reference and navigation. Till next time … Cheers!

Series Links

Part 1 Part 2 Part 3 Part 5 Part 6 Part 7 Part 8 Part 9 Part 10 Part 11