An Application in AngularJS with ASP.Net MVC

Introduction

AngularJS is a well known word and identifies itself as one of the major JavaScript frameworks know today to most of the front-end developers. There are many among you, who might be already aware of this framework and have worked on it extensively. I recognize it as a MVVM model framework but many of you may say it is a MVC model framework. On the other corner of earth there lives an old and well known Framework from Microsoft known as ASP.Net MVC. Today these two technologies are vastly in use together. I have also created a series of post on the topic of using AngularJS with ASP.Net MVC.

Agenda

These posts shows how these technologies are combined together to build an effective web application, which has the beauty of AngularJS and power of ASP.Net MVC. The purpose of these posts is to cover up a few basic concepts, which gives you the idea on using these two worldly technologies together. I am not going to teach AngularJS or ASP.Net MVC in here. and assume that you have already worked on both of these technologies and want to build some thing which uses both.

There are numerous articles on the web where the same concept has been demonstrated, but it always seems to me there there is something missing. Everyone who is trying to explain the concept of AngularJS with ASP.Net MVC, try to squeeze the topic in one or two posts or get distracted 2 much that the readers loose the track. Again this is my personal opinion, and you might have found the best article on this already. My way of explaining this is little bit different and I like all clean from beginning. During these posts you will see a minimal ASP.Net MVC Application with AngularJS implemented on top of that.

Using AngularJS with ASP.Net MVC:

  1. Prerequisites and Visual Studio Web Application Template
  2. Create a Simple ASP.Net MVC application
  3. Cleaning up the Application Template and using Bower
  4. Obfuscation and Minimize the Scripts
  5. Completing the ASP.Net MVC application with Twitter Bootstrap
  6. Start using AngularJS and AngularJS Routing
  7. Replace Angular Routing with UI-Router States
  8. Multiple and Nested Views with UI-Router
  9. ASP.Net MVC Area and AngularJS Modules
  10. Authorization of Content in AngularJS
  11. Authorization or content in ASP.Net MVC for AngularJS

You can go through the list and navigate through each of the posts to understand basics of using AngularJS with ASP.Net MVC. In case you have any queries on this topic, you can always reach be by leaving your comments below. Hope you will enjoy the topic and this will help you the concept at the core level.

Please leave your feedback in case you find any difficulties in understanding or have any confusion here. It will help me in improving the upcoming posts.

Have a nice days … Cheers!

AngularJS with ASP.Net MVC (Part 11)

A step by step tutorial on how to use AngularJS with ASP.Net MVC

Precap

A secure AngularJS with ASP.Net MVC application has been created during the course of this tutorial. We have created a minimalist ASP.Net MVC application and implemented AngularJS framework on top of that. The security for the content is currently at the client side and is managed by AngularJS. In case you have not gone through the posts, I would recommend going through them. Here is the link for the first post in the series “AngularJS with ASP.Net MVC“.

Adding ASP.Net Authorization

For this tutorial we will be using authorization filters on the actions where we are expecting a login. If the user is logged in, it should send the token as a header named “X-Request-Template” (you are free to choose the name). Let’s create a new class file named “AuthorizedAccessFilterAttribute.cs” in folder Customization (in case you don’t have that folder, please go ahead and create in the project root). Here is the code for the class.

using System.Net;
using System.Web.Mvc;

namespace AngularJSwithMVC.Customization
{
    public class AuthorizedAccessFilterAttribute : FilterAttribute, IAuthorizationFilter
    {
        public string Role { get; set; }

        public void OnAuthorization(AuthorizationContext filterContext)
        {
            // check if the token is present
            var token = filterContext.RequestContext.HttpContext.Request.Headers["X-Request-Template"];

            // validate the token and access
            if (string.IsNullOrEmpty(token))
            {
                filterContext.Result = new HttpUnauthorizedResult();
            }
            else {
                // check for existence of role in claims
                if (!TokenHasRole(Role)) {
                    filterContext.Result = new HttpStatusCodeResult(HttpStatusCode.Forbidden);
                }
            }
        }

        private bool TokenHasRole(string role) {
            //TODO: check if the token as the claim for the given role
            return true;
        }
    }
}

The above class has defined a new Attribute which will be using to decorate the Index Action of DefaultController from Customer Area. Here is the code for that controller after the modification.

using AngularJSwithMVC.Customization;
using System.Web.Mvc;

namespace AngularJSwithMVC.Areas.Customer.Controllers
{
    public class DefaultController : Controller
    {
        [AuthorizedAccessFilter]
        // GET: Customer/Default
        public ActionResult Index()
        {
            return PartialView();
        }
    }
}

If you try to navigate to the Customer link, you will not be able to do that. This is because, this Action now requires a header named “X-Request-Template” containing the JWT.

Pass the Token

In our previous post, we have already created a JWT and the same is stored in the localStorage of the browser, which now we should pass to each template requests. For this we will be modifying the app.config.js file. Here is the code after the above said modification.

(function () {
    'use strict';

    angular.module('app')
        .config(['$locationProvider', '$templateRequestProvider', 'authorizationProvider', function ($locationProvider, $templateRequestProvider, authorizationProvider) {
            $locationProvider.hashPrefix('');

            // add the token to the view requests
            var headers = [];
            var httpOptions = {};

            headers['X-Request-Template'] = authorizationProvider.getToken();
            httpOptions.headers = headers;

            $templateRequestProvider.httpOptions(httpOptions);
        }]);
})();

The authorization service is also modified to read and return the token from the localStorage. Here is the code for same.

(function () {
    'use strict';

    angular.module('app')
        .provider('authorization', function () {
            var getToken = function () {
                return localStorage.getItem('access-token');
            }

            this.getToken = getToken;

            this.$get = ['$q', function ($q) {
                var service = {};

                service.chechAuthorization = function (role) {
                    var deferred = $q.defer();

                    var token = getToken();
                    // TODO: logic to see if the token has
                    // the permission required for the given role.
                    // here should be logic to extract the claims
                    // from token and get the roles from it
                    // we are simply checking as of now, if the token exists
                    if (token) {
                        deferred.resolve();
                    }
                    else {
                        alert("You are not authorized to view this section.")
                        deferred.reject();
                    }

                    return deferred.promise;
                };

                return service;
            }];
        });
})();

At this point, if you run the application, the token stored in the localStorage is picked up and sent with the template request and you are able to see the response.

Notifying Access Denied

If you are not having the token in the localStorage, and the user tries to access the Customer link, he simply sees no response. We should show some sort of message to user, telling what just happened. Let’s create an interceptor and attach it to the $httpProvider. Here a new js file named “app.templateRequestInterceptor.provider.js” created under the providers folder and is included in the BundleConfig.cs. Below is the code for the file.

(function () {
    'use strict';

    angular.module('app')
        .provider('templateRequestInterceptor', function () {
            this.$get = ['$q', function ($q) {
                var interceptor = {};

                interceptor.responseError = function (response) {
                    if (response.config.showAlertsOnError) {
                        if (response.status === 401) {
                            alert(response.config.message401 || "Access Denied!");
                        } else if (response.status === 403) {
                            alert(response.config.message403 || "Access Denied!");
                        }
                    }
                    return $q.reject(response);
                }

                return interceptor;
            }]
        });
})();

Above interceptor captures the error response and shows an alert, in case the request config has this enabled. The request config has these few new custom properties, which are added to the $httpOptions of the $templateRequestProvider. The newly created interceptor is also added to the $httpProvider as shown in the code block below for app.config.js file.

(function () {
    'use strict';

    angular.module('app')
        .config(['$locationProvider', '$templateRequestProvider', 'authorizationProvider', '$httpProvider', function ($locationProvider, $templateRequestProvider, authorizationProvider, $httpProvider) {
            $locationProvider.hashPrefix('');

            // add the token to the view requests
            var headers = [];
            var httpOptions = {};

            headers['X-Request-Template'] = authorizationProvider.getToken();
            httpOptions.headers = headers;
            httpOptions.showAlertsOnError = true;
            httpOptions.message403 = "You are not authorized to view this section.";
            httpOptions.message401 = "Please sign in to view this section.";

            $templateRequestProvider.httpOptions(httpOptions);

            $httpProvider.interceptors.push('templateRequestInterceptor');
        }]);
})();

We are Secured

That’s all, we are ready to showcase the application now. Here is how it is reacting now.

The End

I have tried to cover a few of many aspects to AngularJS with ASP.Net MVC here during the series of posts. I can’t say that this is an exclusive guide of best practices and all the things you can do with this combination of technology, but it is most common practice. It should help you kick start on the concept and let you move ahead with a fresh idea.

In case you are stuck up some where for this topic, or you may have any generic question related to this topic, please feel free to leave your comments below. I will do my best to answer your questions as early as possible. Your feedback is important to me and help me improve the content in upcoming posts.

While, we are talking about the upcoming blog, I guess, I have told you during the previous post that I am going to start a tutorial on TypeScript for Beginners. Please subscribe to the blog in case you are interested in following that and all upcoming topics.

Thanks for following the series “AngularJS with ASP.Net MVC“. See you next time … cheers!

Series Links

Part 1 Part 2 Part 3 Part 4 Part 5 Part 6 Part 7 Part 8 Part 9 Part 10

AngularJS with ASP.Net MVC (Part 10)

A step by step tutorial on how to use AngularJS with ASP.Net MVC

Precap

We have almost built our simple AngularJS with ASP.Net MVC application during the course of a few posts. The application shows how AngularJS integrates with ASP.Net MVC and uses a few of its features. In case you have not gone through the posts, I would recommend going through them. Here is the link for the first post in the series “AngularJS with ASP.Net MVC“.

Made for Each Other

As I am telling you from the beginning that this tutorial series is not to teach AngularJS or ASP.Net MVC, but to show, how you can use these two technologies together effectively. You might have found till now that these two technologies mix up quite well and can be great if coupled together properly. There is one more area where it can be seen, if used together, they can do wonders and that is Authorization of Content.

Authorization in AngularJS

We will see during the course of this post that how we implement the Authorization in AngularJS only. We have already created an AngularJS application which has a few routes and they all are open to every one. Now let’s say that we have to protect the Page 1, which should be accessible only when there is a user signed in (we will be simulating the sign in process by putting a token in bower’s localStorage). So, let’s begin.

Create Authorization Service

We will take help of an AngularJS service, which will tell if the current user has the access to the given route or not. For the simplicity and quickly moving ahead, you can take a reference from the code snippet below.

(function () {
    'use strict';

    angular.module('app')
        .provider('authorization', function () {
            var getToken = function () {
                return localStorage.getItem('access-token');
            }
            this.$get = ['$q', function ($q) {
                var service = {};

                service.chechAuthorization = function (role) {
                    var deferred = $q.defer();

                    var token = getToken();
                    // TODO: logic to see if the token has
                    // the permission required for the given role.
                    // here should be logic to extract the claims
                    // from token and get the roles from it
                    // we are simply checking as of now, if the token exists
                    if (token) {
                        deferred.resolve();
                    }
                    else {
                        alert("You are not authorized to view this section.")
                        deferred.reject();
                    }

                    return deferred.promise;
                };

                return service;
            }];
        });
})();

This code has been created in a new file named app.authorization.provider.js under folder Scripts -> app ->providers. This service has a single method having the logic to check if the given role is part of the topic. The token is read from browser’s localStorage. The logic here is not the main point of discussion, but to simply demonstrate the use of service to detect the authorizations. You are master of your rules and logic, and I am sure you will be perfectly fine, writing a better and secured logic here. So, let’s move ahead and use this service.

Note: Remember to include the newly created file in the BundleConfig.cs.

Securing AngularJS Route

In the previous step we have created a service which will tell us if the given role is present in the claims received in token. Now we have to modify the route configuration for the state named “page1”. Here is the code after modification of file named app.route.js (notice the highlighted code)

(function () {
    'use strict';

    angular.module('app')
        .config(['$stateProvider', '$urlRouterProvider', function ($stateProvider, $urlRouterProvider) {
            $urlRouterProvider.otherwise('/');
            $stateProvider
                .state('home', {
                    url: '/',
                    templateUrl: '/Home/Home'
                })
                .state('page1', {
                    url: '/Page1',
                    resolve: {
                        hasPermission: ['authorization', function (authorization) {
                            console.log('Checking permissions ...')
                            return authorization.chechAuthorization("Customer");
                        }]
                    },
                    views: {
                        '@': {
                            templateUrl: '/Home/Page1'
                        },
                        'left@page1': {
                            templateUrl: 'Home/Page1Left'
                        },
                        'right@page1': {
                            templateUrl: 'Home/Page1Right'
                        }
                    }
                })
                .state('page3', {
                    url: '/Page3',
                    templateUrl: '/Home/Page3'
                });
        }]);
})();

Once you are done with above modification, build and run your application. Try to navigate to Page 1. You will see a message and it will not navigate to Page 1. Here is how it is behaving now.

Getting a Token

We will use a JSON Web Token (JWT) and store it in local storage at client side. There are many online sites, which can generate a JWT for you, where you provide the list of required and additional claims and select a duration for which they should be valid. I have used one of such site (Googled and picked the first result). The main thing to be noted here is the claim(s) we need for this post. I have added a Role claim with a value Customer. Once you have generated the token, open your browser’s developer tools and save the token with a key named “access-token”. Remember to do this while you are running your simple application, so that this token is available to your site. Here is how I have done is for chrome browser.

Now try to access the Page 2, you should be able to do it.

Can it be Improved?

Wow, that’s great. We have an application which can now react to the tokens received by the authentication process. But, it is at the client side and the user can manipulate the code. In the next post we will see, how we can improve this security by moving the authorization logic to server side. We will be securing the views itself, so that the user is not able to get the view if their token doesn’t contain the required role.

Hope, you are enjoying the series. As we are nearing to the end of this series, I would like you to keep a watch on this blog, because you are going to see soon a new series on topic TypeScript – Beginner Course. Please leave any comments or queries if you have any and I will try to answer them as soon as possible. I will appreciate your feedback as it will help me improve the content further.

Thanks for following … cheers!

Series Links

Part 1 Part 2 Part 3 Part 4 Part 5 Part 6 Part 7 Part 8 Part 9 Part 11

AngularJS with ASP.Net MVC (Part 9)

A step by step tutorial on how to use AngularJS with ASP.Net MVC

Precap

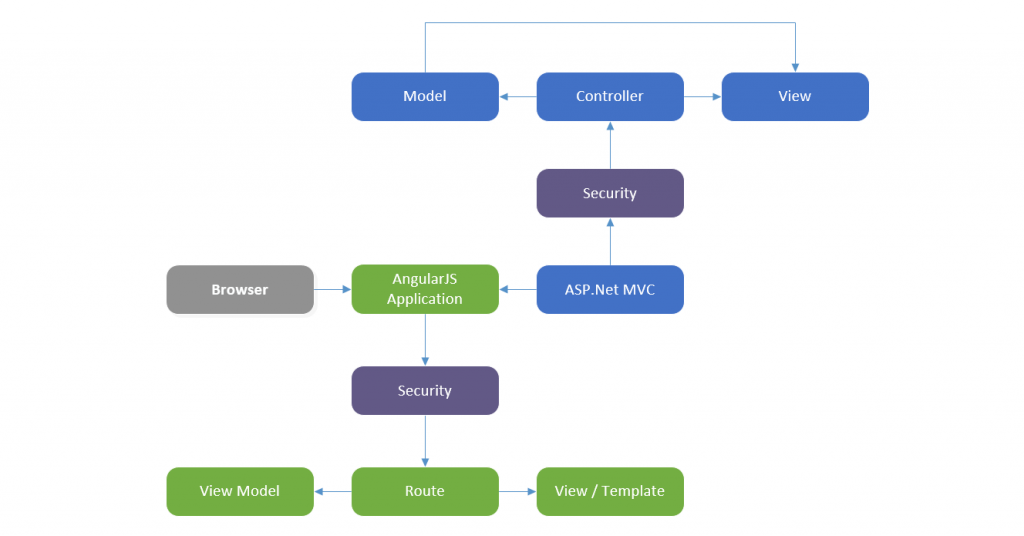
Our simple AngularJS with ASP.Net MVC application is already showing off a mixture of two worlds. We started with a plain ASP.Net web applications and molded it, making a base for demonstrating, how at the core level an MVC application can be served as an AngularJS application. Nothing so serious about that. Till now you just served the contents of a MVC view in place of a static HTML page. By the way if you haven’t gone through the previous posts, you can always start it from beginning here. In this post of the series we will be talking about dividing the application into modules (AngularJS) and Areas (ASP.Net MVC).

Match at Next Level

We have already shown how a MVC view can be used for the view template for the AngularJS application. The next thing in AngularJS is modules and these useful in dividing and clubbing the business logic of the application. Say for example you would like to club all the things a Customer can do on your site or there is an Administration part of the site where Admin can control the things. All these interlinked things and functionalities can be and should be bundled together in a single AngularJS module. In the ASP.Net world these things are called Areas, where you club the similar and related functionalities together.

AngularJS modules are not just for the bundling together the business logic for the application navigation but also for the other components like all the API interfaces in a single module for a single service or your custom directives in another one. Similar is not done for the ASP.Net Areas.  Don’t worry, we are going to see that with a small example here very soon.

Soon! why ? … why not just jump into it right away. And do sit tight, as in this post you are going to see a lot of code.

Create an Area

It is very simple and Visual Studio makes it very easy for us, just right click on your project and select Add -> Area, give it a name ( in my case i am going to name it as Customer). visual studio create few folders and files. Once new area is created, we will create 2 controllers named Default and Profile in there. Here is the code snippet to these 2 controllers.

// DefaultController.cs
using System.Web.Mvc;

namespace AngularJSwithMVC.Areas.Customer.Controllers
{
    public class DefaultController : Controller
    {
        public ActionResult Index()
        {
            return PartialView();
        }
    }
}
// ProfleController.cs
using System.Web.Mvc;

namespace AngularJSwithMVC.Areas.Customer.Controllers
{
    public class ProfileController : Controller
    {
        public ActionResult Index()
        {
            return PartialView();
        }
        public ActionResult Edit()
        {
            return PartialView();
        }
    }
}

In the above code you can see that there are 3 actions methods defined in total. The methods are also returning the partial views. One point to be noted here is that as soon as you add a view to the area, the NuGet packages for bootstrap, jQuery and Mordernizr will be add to the project. You can remove those packages safely here for this project.

Let’s add views for each respective action methods. Here is the snippet for the views.

<!-- Default/Index.cshtml -->
<div class="panel" ui-view="section"></div>
<!-- Profile/Index.cshtml -->
<div class="panel-body">
    <div class="row">
        <div class="col-md-12">
            <b>Name:</b> {{customer.name}}<br />
            <b>Age:</b> {{customer.age}}<br />
        </div>
    </div>
</div>
<div class="panel-footer">
    <button class="btn btn-warning" ui-sref=".edit">Edit</button>
</div>
<!-- Profile/edit.cshtml -->
<div class="panel-body">
    <div class="row">
        <div class="col-md-12">
            <b>Name:</b><input class="form-control" type="text" ng-model="editingCustomer.name" /><br />
            <b>Age:</b><input class="form-control" type="text" ng-model="editingCustomer.age" /><br />
        </div>
    </div>
</div>
<div class="panel-footer">
    <button class="btn btn-success" ng-click="save()">Save</button>
    <button class="btn btn-warning" ng-click="cancel()">Cancel</button>
</div>

Area Registration

With all that defined, you have to register the MVC Area properly so that the default controller and action method of the area is known by the application. Here is how the CustomerAreaRegistration.cs file looks.

using System.Web.Mvc;

namespace AngularJSwithMVC.Areas.Customer
{
    public class CustomerAreaRegistration : AreaRegistration
    {
        public override string AreaName
        {
            get
            {
                return "Customer";
            }
        }

        public override void RegisterArea(AreaRegistrationContext context)
        {
            context.MapRoute(
                "Customer_default",
                "Customer/{controller}/{action}/{id}",
                new {controller= "Default", action = "Index", id = UrlParameter.Optional }
            );
        }
    }
}

Notice the highlighted line in the above code, this is only line we have modified from the default.

It’s time for the explanation now. This new area (Customer) has the responsibility of showing and editing the customer profile. In future if we need to perform any other operations on the Customers like, view / Edit contact information, or reset password, all the templates for these features should be clubbed in there in this area.

AngularJS Module

The real control is in the hands of AngularJS module. We have to define a new module in AngularJS. This module will have its own config and routing, all related to the customers. to do that first of all we need to define this new module. for the sake of code manageability, we should divide the code for module and its configs in separate files. Let’s create these 3 files in customer sub-directory under modules directory (newly created) of app directory (Scripts -> app -> modules -> customer).

// customer.module.js
(function () {
    'use strict';

    angular.module('customer', ['ui.router']);
})();
// customer.config.js
(function () {
    'use strict';

    angular.module('customer')
        .config(function () {
            // nothing as of now
        });
})();
// customer.route.js
(function () {
    'use strict';

    angular.module('customer')
        .config(['$stateProvider', function ($stateProvider) {
            $stateProvider
                .state('customer', {
                    url: '/Customer',
                    templateUrl: '/Customer',
                    resolve: {
                        customer: function () {
                            console.log('Resolving Customer');

                            var customer = {
                                name: 'John Doe',
                                age: 23
                            };
                            return customer;
                        }
                    },
                    controller: ['$scope', 'customer', function ($scope, customer) {
                        console.log('Customer Controller');

                        $scope.customer = customer;
                        $scope.saveEdits = function (customer) {
                            $scope.customer = customer;
                        }
                    }]
                })
                .state('customer.profile', {
                    url: '/Profile',
                    views: {
                        'section@customer': {
                            templateUrl: '/Customer/Profile'
                        }
                    }
                })
                .state('customer.profile.edit', {
                    url: '/Edit',
                    views: {
                        'section@customer': {
                            templateUrl: '/Customer/Profile/Edit',
                            controller: ['$scope', '$state', '$stateParams', function ($scope, $state) {
                                console.log('Customer Edit Controller');

                                $scope.editingCustomer = angular.copy($scope.customer)

                                var save = function () {
                                    $scope.saveEdits($scope.editingCustomer);
                                    $state.go('^');
                                };

                                var cancel = function () {
                                    $state.go('^');
                                };

                                $scope.save = save;
                                $scope.cancel = cancel;
                            }]
                        }
                    }
                });
        }]);
})();

Remember, for the sake of this tutorial only, I have defined the controllers in-line for these route definition. But, it is always a good practice to code the controllers in the separate files and refer the controllers here by name.

Let’s Goto Meeting …

We now have all the required components. We have to first include these new scripts in the script package for the clients to receive them, and you know how to do that, yes, include them in the BundleConfig.cs. Here is the code snippet showing the modification.

"~/bower_components/bootstrap/dist/js/bootstrap.js",
"~/Scripts/app/modules/customer/customer.module.js",
"~/Scripts/app/modules/customer/customer.config.js",
"~/Scripts/app/modules/customer/customer.route.js",
"~/Scripts/app/app.module.js",

Now, inject this newly created module in app module. Your code should look something like the one shown in the snippet below.

(function () {
    'use strict';

    angular.module('app', ['ui.router', 'customer']);
})();

It’s time to change the angular routing to load that new module on navigation to a particular route. First of all, lets modify the _Layout.cshtml of our main MVC application (remember the we may have a _Layout.cshtml in the Area folder also, which we are ignoring as of now.). Here are the line modified for the file.

As you might have noticed the we have removed the page2 link from the navigation. We should now remove the state definition for the same from the app.route.js This all completes the code for this post and we should be able to compile and run the application.
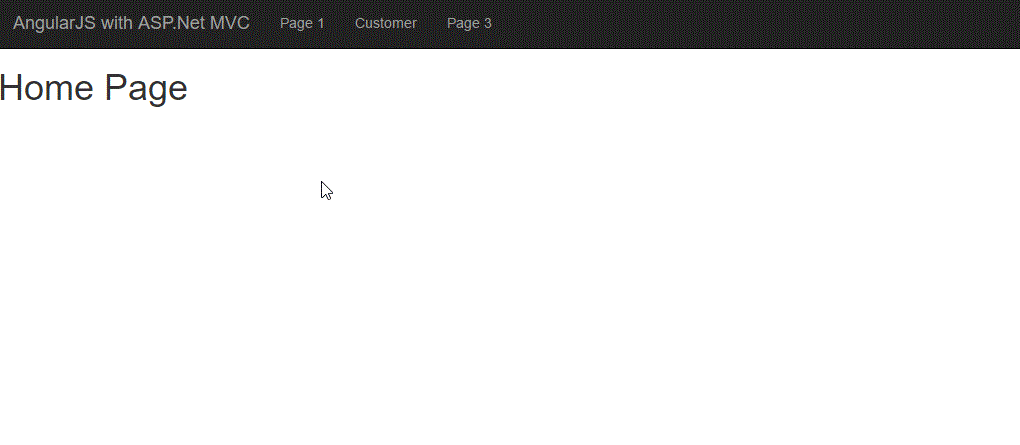
The output

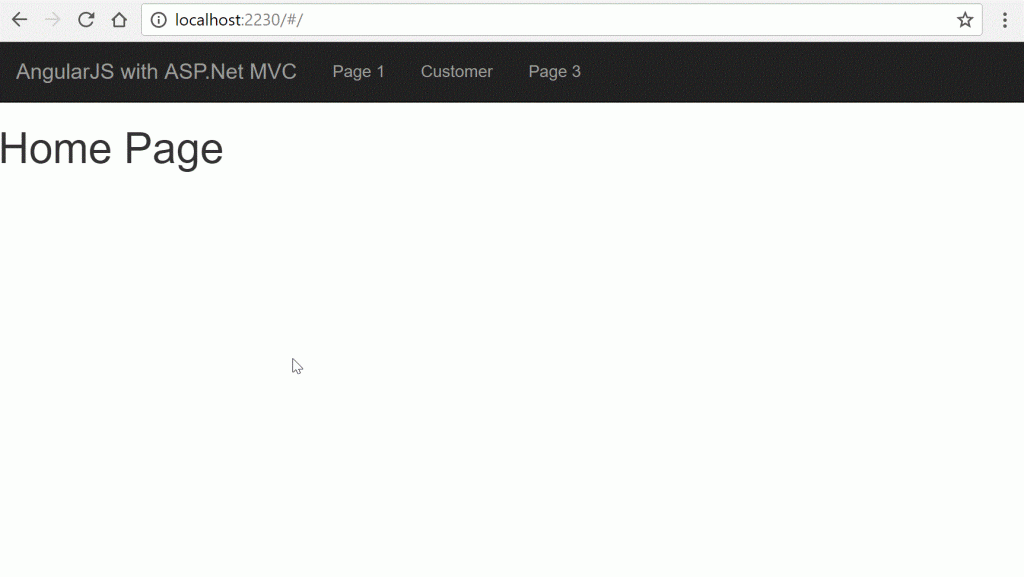
Our new module is now active and is available as a link in the navigation. The code is totally separate and can be easily removed in case we are not interested in loading the module or don’t want that module at all, by simply removing the Area, module directory and a few lines from app module. This increase the manageability of the application code and separates the concerns from each other. Hope you have also, completed the code till here and not faced any issue till now.

In case you have any difficulties or need any clarification, please feel free to leave your comments below. I will try my best to answer the queries as soon as possible.

We are now nearing the end of this series on the topic “AngularJS with ASP.Net MVC”. The only thing which remains here as per the scope of this series is “Content Authorization”. I will continue to the next post and leave you here with your code so that you can play with it and get more clarity on it.

Series Links

Part 1 Part 2 Part 3 Part 4 Part 5 Part 6 Part 7 Part 8 Part 10 Part 11

AngularJS with ASP.Net MVC (Part 8)

A step by step tutorial on how to use AngularJS with ASP.Net MVC

Precap

I have started this as a multi-post tutorial a few posts back. In the previous parts we have created a minimal project in Visual Studio 2015 using Web Application’s Empty template with MVC folders and references. The application is running now with the bootstrapped UI containing a navigation of 3 pages. It has been demonstrated how differently application behaves with MVC routing and AngularJS routing. In the previous post we have replaced the angular-route with ui-router and the application is behaving same. You can read those posts part 1part 2part 3part 4part 5part 6 and part 7 in case you have not gone through that already. Let’s move to next step where we will be demonstrating the core feature of a ui-router’s state.

URL vs State

With angular-route, we are bound to the url, i.e. each resource is linked to its url. whereas in case of ui-router resources are liked to state which intern gets linked to optional url. There are scenarios in large applications, where we would like to keep the url same, but change the content based on some conditions. In simple words content is based on the state of the application in place of URL in the navigation bar.

View vs Views

angular-route can only show a single view at a time and view nesting is not supported. Whereas in case of ui-router, we can have multiple view in a single template, which also can be nested inside of other.

for example, we can define separate templates for header, footer, navigation and content on the same page. See the images below for more clarity.

P2163_001

Let’s be Practical

We have seen in part 7 how the states are defined. Here today we will see how we can have multiple / nested views in a given template. In the previous post, we have defined state as below.

state('home', {
    url: '/',
    templateUrl: 'Home/Home'
})

Let’s extend this for having multiple views per state. To do so, modify your page1 state as below.

state('page1', {
                    url: '/Page1',
                    views: {
                        '@': {
                            templateUrl: '/Home/Page1'
                        },
                        'left@page1': {
                            templateUrl: 'Home/Page1Left'
                        },
                        'right@page1': {
                            templateUrl: 'Home/Page1Right'
                        }
                    }
                })

Notice the views object, which replaced the templateUrl. It contains a few fields containing ‘@’. These fields defines the target for the view template. You can read that notation as <viewName>’@'<stateName>. In case of the first field, where viewName and stateName are missing means that it should target the ui-view which has no name and is not defined by any state. Do you know which view placeholder we are talking here. Yes, you are right, the one which we have declared in Index.cshtml.

Where are the other views?

Continue to modify the files as per the snippets below and then we will talk. Open your HomeController.cs and add to new actions methods as shown in the snippet below.

public ActionResult Page1()
{
    return PartialView();
}

public ActionResult Page1Left()
{
    return PartialView();
}

public ActionResult Page1Right()
{
    return PartialView();
}

public ActionResult Page2()
{
    return PartialView();
}

Add the corresponding views for those action methods with the content as shown below

// Page1Left.cshtml
<h2>Left</h2>
// Page1Right.cshtml
<h2>Right</h2>

Modify the Page1.cshtml as per the snippet below.

<h1>Page 1</h1>
<div class="row">
    <div class="col-md-6 col-sm-6" ui-view="left"></div>
    <div class="col-md-6 col-sm-6" ui-view="right"></div>
</div>

Correct! you got it. In page1.cshtml, there you can see that 2 more ui-view’s are defined. Page1.cshtml is loaded by the page1 state as the base so, left and right views are state defined views and that’s why the routing configuration we have mentioned as left@page1 and right@page1.

The Output

P2163_002


If you navigate to Page1, you will see the above output. Here, index.cshtml loads the page1.cshml and page1.cshtml loads page1left.cshtml with page1right.cshtml. This demonstrates the view nesting with multiple views.

Why MVC View rather static HTML?

Static HTML pages are good in case where we don’t want to change the contents of the html template at run time. But in a scenario where we would like to change the contents of the template MVC view are very useful. Along with that there might be scenarios where we would like to show different templates itself based on different user roles and authorizations. We can control a lot more with MVC views as compared to the static HTML. The possibilities are unlimited.

Truly speaking, this is the ultimate reason, why anyone would want to use AngularJS with ASP.Net MVC. In the next post we will see more aspects of ASP.Net MVC getting utilized in this application rather just getting template view from it.

In case you have any questions or concerns, please do leave your comments below. I will try to answer them as soon as possible. Your feedback will help me improve the contents. Have a nice day.

Series Links

Part 1 Part 2 Part 3 Part 4 Part 5 Part 6 Part 7 Part 9 Part 10 Part 11