

A step by step tutorial on how to use AngularJS with ASP.Net MVC
Precap
I have started this as a multi-post tutorial a few posts back. In the previous parts we have created a minimal project in Visual Studio 2015 using Web Application’s Empty template with MVC folders and references. The application is running now with the bootstrapped UI containing a navigation of 3 pages. It has been demonstrated how differently application behaves with MVC routing and AngularJS routing. In the previous post we have replaced the angular-route with ui-router and the application is behaving same. You can read those posts part 1, part 2, part 3, part 4, part 5, part 6 and part 7 in case you have not gone through that already. Let’s move to next step where we will be demonstrating the core feature of a ui-router’s state.
URL vs State
With angular-route, we are bound to the url, i.e. each resource is linked to its url. whereas in case of ui-router resources are liked to state which intern gets linked to optional url. There are scenarios in large applications, where we would like to keep the url same, but change the content based on some conditions. In simple words content is based on the state of the application in place of URL in the navigation bar.
View vs Views
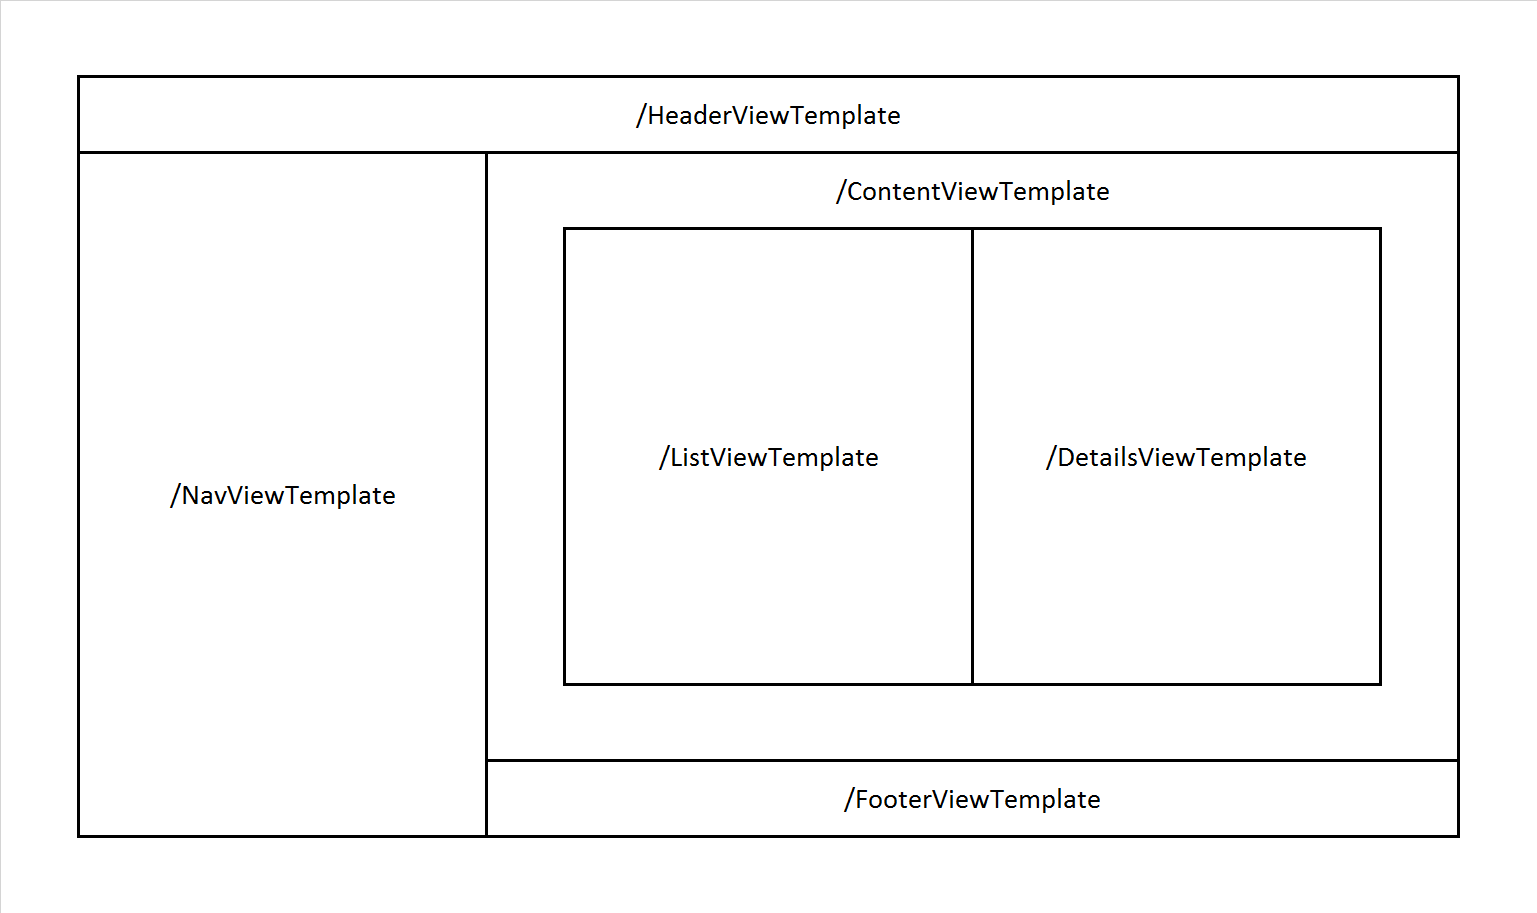
angular-route can only show a single view at a time and view nesting is not supported. Whereas in case of ui-router, we can have multiple view in a single template, which also can be nested inside of other.
for example, we can define separate templates for header, footer, navigation and content on the same page. See the images below for more clarity.
Let’s be Practical
We have seen in part 7 how the states are defined. Here today we will see how we can have multiple / nested views in a given template. In the previous post, we have defined state as below.
state('home', {
    url: '/',
    templateUrl: 'Home/Home'
})
Let’s extend this for having multiple views per state. To do so, modify your page1 state as below.
state('page1', {
                    url: '/Page1',
                    views: {
                        '@': {
                            templateUrl: '/Home/Page1'
                        },
                        'left@page1': {
                            templateUrl: 'Home/Page1Left'
                        },
                        'right@page1': {
                            templateUrl: 'Home/Page1Right'
                        }
                    }
                })
Notice the views object, which replaced the templateUrl. It contains a few fields containing ‘@’. These fields defines the target for the view template. You can read that notation as <viewName>’@'<stateName>. In case of the first field, where viewName and stateName are missing means that it should target the ui-view which has no name and is not defined by any state. Do you know which view placeholder we are talking here. Yes, you are right, the one which we have declared in Index.cshtml.
Where are the other views?
Continue to modify the files as per the snippets below and then we will talk. Open your HomeController.cs and add to new actions methods as shown in the snippet below.
public ActionResult Page1()
{
    return PartialView();
}

public ActionResult Page1Left()
{
    return PartialView();
}

public ActionResult Page1Right()
{
    return PartialView();
}

public ActionResult Page2()
{
    return PartialView();
}
Add the corresponding views for those action methods with the content as shown below
// Page1Left.cshtml
<h2>Left</h2>
// Page1Right.cshtml
<h2>Right</h2>
Modify the Page1.cshtml as per the snippet below.
<h1>Page 1</h1>
<div class="row">
    <div class="col-md-6 col-sm-6" ui-view="left"></div>
    <div class="col-md-6 col-sm-6" ui-view="right"></div>
</div>
Correct! you got it. In page1.cshtml, there you can see that 2 more ui-view’s are defined. Page1.cshtml is loaded by the page1 state as the base so, left and right views are state defined views and that’s why the routing configuration we have mentioned as left@page1 and right@page1.
The Output

If you navigate to Page1, you will see the above output. Here, index.cshtml loads the page1.cshml and page1.cshtml loads page1left.cshtml with page1right.cshtml. This demonstrates the view nesting with multiple views.
Why MVC View rather static HTML?
Static HTML pages are good in case where we don’t want to change the contents of the html template at run time. But in a scenario where we would like to change the contents of the template MVC view are very useful. Along with that there might be scenarios where we would like to show different templates itself based on different user roles and authorizations. We can control a lot more with MVC views as compared to the static HTML. The possibilities are unlimited.
Truly speaking, this is the ultimate reason, why anyone would want to use AngularJS with ASP.Net MVC. In the next post we will see more aspects of ASP.Net MVC getting utilized in this application rather just getting template view from it.
In case you have any questions or concerns, please do leave your comments below. I will try to answer them as soon as possible. Your feedback will help me improve the contents. Have a nice day.
Series Links
Part 1 Part 2 Part 3 Part 4 Part 5 Part 6 Part 7 Part 9 Part 10 Part 11