How To: Quickly Create Multiple VMs in VMWare Workstation

Quickly Create Multiple VMs in VMWare Workstation

Recently, I got a requirement to create an environment for a proof of concept up and running very quickly. I was required to create a setup which contained around 9 VMs running Ubuntu Linux OS. As it was a setup which was not concerning about the performance of the individual machines, but to demonstrate a network infrastructure and the system connectivity layout. So, you may ask what is the problem then … go and create. But there was not a single problem:

  1. The problem was that to get 9 machines all together in a short period of time was difficult.
  2. The requirement was for a short span of time, just to demonstrate the infrastructure.
  3. Creating the multiple machines of same configuration is a bit time consuming task, where we were already running out of time.

the solution was to use a virtualization platform like, Hyper-V VMWare etc. We picked VMWare Workstation as the platform for the virtualization. Now if we get one machine with enough power to run the virtualization and host these many machines, we can get it all running quickly. We identified a file server with a minimal utilization of RAM and Processor and decided to use it. Though the issues standing in front of us were getting fainted, but there was another issue. the file server we identified was at its peak of the Disc Space consumption. So to host 9 VMs say size of 10GB  each (Ubuntu base installation with all updated requires much lesser then that, around 6 – 7 GB and with 2 GB of RAM each), we required about 23 more GBs in the server. To free up that space we needed time to identify the unnecessary files which we didn’t had (we had already spent half day to reach to this position).

So the next thing was to somehow reduce the number of GBs required to create a VM was the only solution left. how we do that. Here comes the trickiest part in to the picture.

  1. Created a virtual machine with the base installation of the required OS with all patches and updates. (if you are interested in learning how to install a Ubuntu OS in VMWare you can follow this post). Here is the configuration of the base VM:
    • 10GB Virtual HDD
    • 2 GB RAM
    • NAT Connection
  2. Once the VM was ready, we switched off the VM and took a snapshot of the VM.
    W
    hat happens when we take the snapshot of the VM, it creates a differential file of the Virtual HDD (there are many other things it does, but we are interested only in this) leaving the original file as it is.
  3. In Microsoft windows there is a feature of creating the symbolic links of the files and folder. you can use this links files as you are using the original files and the modifications to the contents of the link will effect the contents of the original file.
    We used hard links to create 8 more replicas of the HDD from the first base VM. Here is the command which you should execute with the administrator privileges:

    mklink /h <target_file_name_with_path> <source_file_name_with_path>
  4. Once the copies of the HDDs were available we just need to create new VMs using these existing HDDs and take a snapshot immediately, before power up.
    Note: If you forget the snapshot part of the copy, before powering up any VM for the first time you may end up wasting all of your efforts.

If you carefully, follow the above steps you will be able to run all the VMs in parallel with a single HDD (individual differential files), making it use the minimal space required on the host and wasting the time in copy paste of the VM in whole (around 7 GB).

Using this setup, we were able to fit all the VMs in about 30GB while running in place of 90GB of initial requirement. I hope this technique will be helpful some day to someone. Please leave your comments below in case you find this helpful.
Follow me :

youtubefacebooktwittergoogleplus

Website Optimization: Try to Escape from 404 – Page Not Found

Article ID : Tip-003
Article Topic : Website Optimization
Article Title : Try to Escape from 404 – Page Not Found


Preface

Wen client always creates a request for the resources referenced in the page it is rendering and if server can’t find it sends 404 – Page Not Found.

Explanation

When we create a website with a number of webpages and embedded resources like images (in HTML and CSS), JavaScript Files or Cascading Style Sheets, it is well obvious that we may skip something to include or we have referenced which is not present in the application. If this missing is visible, it can be caught and taken care. But, what if it is not visible?

Let’s talk about the favicon.ico. Microsoft started the concept of the favorite’s icon with IE 4. Since then the trend is started ad is adopted by major browsers to fetch and display the favorite’s icon in the address bar o on the tabs icon (for the bowsers supporting tabs). Earlier the concept was to fetch this icon only when the page is added to the favorite’s menu. But today if the browser has no previous visit recorded for the site the page belongs to will create a domain/favicon.ico request. Once the data is fetched it will cached by the browsers. But if the server returns 404 Error it will try to get that every time the page is requested from the domain.

Most of the cases even after the deployment is over for the site we skip this small thing favicon.ico to be included in the application root and the server is bothered again and again by the requests to provide the information which actually it doesn’t have. Every time without getting frustrated it calmly says 404 – Page Not Found.

How to Resolve

You can avoid this very common situation specifically for the icon case by

  • Using a favicon.ico file in the root of the application.
  • Specifying the page icon in the header of the page.

There a number of tools available out there in the market (freeware or paid), which can help you find out the web requests and response for your browser. Using them you can identify what is requested and what you have received in response. Fiddler is a free tool used for the same purpose.

Conclusion

Any request which cannot be fulfilled by the server is a burden to the server and to the network and to the client who is making that request. We can actually avoid them by using little cautiousness.

Download Word Document

Website Optimization: Serve Resources from Different Hosts

Article ID : Tip-002
Article Topic : Website Optimization
Article Title : Serve Resources from Different Hosts


Preface

Today all modern browsers are multi-threaded. Means they can server the contents while downloading more than one resource simultaneously. But there are still a few restrictions. There can’t be more than 2 parallel requests threads from the same host.

Explanation

When your browser finds an embedded resource in your web page it creates a request from the host to deliver that resource. The browser adds these requests in the host wise resource download queue where they are served on the FIFO basis. If two resources are on the same host and the third one is on the other host it may be possible that you are receiving the third one before the first or second are downloaded. Here are few facts:

1.   Resource Download Queue
Each browser adds the resource request in a download queue. While parsing the HTML contents if the browser comes across any embedded resource like an image file or a style sheet file. It will add it to the download queue.
2.   Priority on the Bases of Resource Type
Every embedded resource download request will go into the queue as and when the parser comes across it and continue to parse the rest. In case of a JavaScript file however the case is bit different. If the browser finds a script file embedded in the Webpage it will stop parsing the rest of the page and will wait for that file to be downloaded first. So if that file is late in the queue, the wait and parsing time is high.
3.   Number of Requests per Host
Today the browsers are multithreaded to serve the content by parallel download and reduce the wait time. But according to the ISDN rule this limited to 2 parallel connections to the same host. So if there are more files embedded in a Webpage. It is going to take a considerably high time to fetch those resources.

How to Resolve

If the contents are served from different hosts the browser can create separate threads for them and have them downloaded parallel. However actually it impossible to have the separate host for each resource, we can have the separate hosts for different type of resources. In real scenarios having separate resource type hosts are also difficult, so we can fool the browser by serving the resources from different Subdomains, like Images from image.domain.com and scripts from script.domain.com. Here are a few points in short

  • Create the separate Subdomains for different type of objects.
  • Separate user images from the interface images and serve them from different Subdomains.
  • You can use the alias in place of actually creating subdomain in the DNS server like image.domain.com -> domain.com. However efficiency is at its max when you have not more than 4 alias per domain.

Conclusion

In case of rich user interface sites where there are high number of images and media files are embedded this technique is quite useful. Simply split the resources across multiple hosts and serve your users a much faster.

Download Word Document

Website Optimization: Reduce Total Number of Objects per Web Page

Article ID : Tip-001
Article Topic : Website Optimization
Article Title : Reduce Total Number of Objects per Web Page


Preface

Whenever a web page is requested from the server, the browser also seeks the embedded objects like style sheets, script files, images, media files etc. and tries to download them along with them. Each download creates a web request.

Explanation

A web page design always consists of various numbers of embedded objects. But sometimes the good UI comes out to be expensive for the user’s time prospective. A user can wait for a page to be loaded with in an average of 10 sec without feedback (refreshing / retrying). Reducing the number of objects in page can reduce the wait time effectively. Here are a few facts.

1.   Average Header Size
Each response consists of a header along with the contents, which is of approximately 512 bytes. Consider there are a number of images which are well optimized to reduce their size, but this header information will also be added to the each image download. For a page containing 100 such images will have to download 25 additional KBs, which is huge even the image size is very less.
2.   Round-Trip Latency
Each request has its legacy time of average 0.2 seconds for the completion of a round trip. So with a page having the 100 objects will delay in loading for 20 seconds irrespective of the speed of the internet connection.
3.   Packet Loss
There is approximate 0.7 percent of the loss of the data in a packet transferred, which will be requested again from the server. Each request creates its own packet of bytes and will lead in to more loss and recovery cycles.

How to Resolve

Even if the page is optimized for the size of objects, there are a few other things which play a considerable role in the website optimization. Reducing number of embedded objects is one of them. Here are a few tips how we can achieve that.

  • Stitch Images together (create a sprite).
  • Combine the different style sheets into one on the bases of their media type like screen, print etc.
  • Combine the script files according to their features and functionality.

Conclusion

There are situations where there it is required to have many number of embedded objects in a page, but still we should try to reduce the number to 20/page and should use the cache-able objects so that they are not requested again and again on every time a page is requested.

Download Word Document

Creating System StoredProcedures in SQL Server

What is System StoredProcedures

A system StoredProcedure is a general stored procedure which started with ‘sp_’. System StoredProcedures are stored into the master database in SQL Server.

Requirement of System StoredProcedure

There are instances when you are required to perform some operations on the different databases, like finding the dependency of the table (sp_depends), you use the system StoredProcedure. There are many System StoredProcedure already provided by the SQL Server. some of the most commonly used are:

  • sp_who
  • sp_depends
  • sp_help
  • sp_helptext

Each of the above provide some pre-defined functionality, but there are chances where you want your own functionality. In that case you can create your own System StoredProcedures. Just create a StoredProcedure with prefix ‘sp_’ in the master database and you are ready to go. Here I am showing one I have created for my ease.

Example

[code language=”SQL” light=”true”]
— ======================================
— Author:      Anant Anand Gupta
— Date:        2010-05-10
— Description: Return the number of
—              records in the Table
— ======================================</p>
<p>USE master
GO</p>
<p>IF  EXISTS (SELECT * FROM sys.objects WHERE object_id = OBJECT_ID(N'[dbo].[sp_GetCount]’) AND type IN (N’P’, N’PC’))
DROP PROCEDURE [dbo].[sp_GetCount]
GO</p>
<p>CREATE PROCEDURE [dbo].[sp_GetCount] @TableName NVARCHAR(776)
AS
BEGIN
SET NOCOUNT ON
DECLARE @str NVARCHAR(1000)
SET @str = ‘Select Count(*) [Record Count] From ‘ + @TableName
EXEC (@str)
END
[/code]

Now you can execute the stored procedure in any database you want like this:

[code language=”SQL” light=”true” toolbar=”false”]
EXEC sp_GetCount ‘<TableName>’
[/code]


Extras

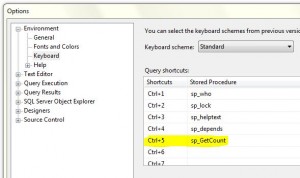
You can also create a keyboard shortcut for the above StoredProcedure to use quickly in between your SQL Code to find out the number of records in the selected table. Go to Tools -> Options -> Keyboard in SQL Server Management Studio. Select the text box in front of the predefined shortcuts which are not used. Enter the name of your StoredProcedure in the TextBox.

Click OK.

Open New Query Window (modifications are not registered with the windows already opened) for the required database. Enter the desired TableName and select the text and press your shortcut (Ctrl + 5 in my case). Here is your result

Enjoy and be more productive at your workplace !!!